Tile Crown – Triple Tile Match
Complete Unity project for Android and iOS. Tap tiles, collect three of a kind in the tray, clear the board.
Introduction
Thank you for purchasing Tile Crown. This guide covers everything from opening the project to publishing your own version of the game. The settings you need are in one place (the Game Config), the screens and popups are regular prefabs, and the levels are plain JSON files you can edit with the built-in Level Editor.
Requirements
- Unity 6000.0 LTS (made with 6000.0.65f1, newer 6000.0 patches work too).
- For Android: the Android Build Support module with its SDK, NDK and OpenJDK (all installed from Unity Hub).
- For iOS: the iOS Build Support module, a Mac with Xcode and CocoaPods.
Included: Unity IAP 4.14 (package), the Google Mobile Ads Unity plugin 11.5 with the External Dependency Manager, and TextMesh Pro (part of uGUI).
Getting started
- Unzip the download. In Unity Hub choose and select the
TileCrownfolder. - Open it with Unity 6000.0. The first import takes a few minutes.
- Open the scene with and press Play.
- Switch the platform to Android or iOS in .
- Open the settings with .
The Tile Crown menu
| Menu item | What it does |
|---|---|
| Level Editor | Opens the Level Editor window. |
| Open Main Scene | Opens Scenes/Main.unity, the only scene of the game. |
| Game Config | Selects the Game Config asset so you can edit it in the Inspector. |
| Documentation | Opens this page. |
| Cheats | Unlock all levels, add 10,000 coins, add 10 of each booster, fill the Star Chest, reset the daily spin, or reset all progress. They change the progress saved on your computer, which Play mode uses. |
| Ads → Use AdMob | Switches the AdMob integration on or off (see Ads). |
| Ads → Use Google Test IDs | Puts Google's test app ids and ad unit ids back everywhere. |
| Reset Art Import Settings... | Reapplies the import settings the pictures in TileMatch/Art need (sprite mode, borders, compression). |
Project structure
| Folder | Contents |
|---|---|
| TileMatch/Art | UI: buttons, panels, tray, tiles, backgrounds, logo and app icon. Icons: button, booster and reward icons. Tiles: the pictures of each tile theme. |
| TileMatch/Audio | Sound effects and the music loop. |
| TileMatch/Config | Tile theme and background theme assets. |
| TileMatch/Documentation | This page. |
| TileMatch/Fonts | Lilita One (titles and buttons) and Fredoka (text), with their TextMesh Pro font assets. |
| TileMatch/Prefabs | The tile, the level button, and in UI every screen, every popup and the logo. |
| TileMatch/Resources | GameConfig, the levels (Levels/level_0001.json …) and the texts (Localization/strings.csv). |
| TileMatch/Scenes | Main.unity. |
| TileMatch/Scripts | Runtime: the game (assembly TileMatch). Editor: the Level Editor, the menu and the import rules (assembly TileMatch.Editor). |
| TileMatch/ThirdPartyLicenses | Licenses of the emoji pictures, the fonts, the Google Mobile Ads plugin and the External Dependency Manager. |
| GoogleMobileAds, ExternalDependencyManager, Plugins | The AdMob plugin, its dependency resolver, and the Gradle templates and native files it needs. |
| TextMesh Pro | TextMesh Pro's essential resources (shaders and settings). |
| Resources/BillingMode.json | Created by Unity IAP, it tells Android builds to use Google Play. |
Game Config
All gameplay, economy, ads and shop settings live in TileMatch/Resources/GameConfig.asset. Select it with ; hover a field in the Inspector for a short explanation.
Gameplay
| Field | Meaning |
|---|---|
| Tray Size | Number of slots in the tray (7). The level is lost when the tray fills up without a match. |
| Par Base Seconds, Seconds Per Tile | Stars: 3 stars when the level is finished within base + seconds per tile × tiles, 2 stars up to 1.5× that time, 1 star after. |
| Built In Levels | How many level files the game loads before it starts generating levels. Saving a level past the end in the Level Editor raises it. |
| Continue Cost | Coins to continue after losing. Continuing puts the last three tiles of the tray back on the board. |
| Extra Time Seconds | Seconds added when continuing a timed level. |
Economy
| Field | Meaning |
|---|---|
| Start Coins, Start Boosters | What a new player starts with. |
| Win Coins | Coins for finishing a level the first time. |
| Coins Per Star | Coins for each new star. A replay only pays for stars the level didn't have yet, so easy levels can't be farmed. |
| Booster Pack Size | How many boosters one purchase with coins gives. |
| Booster Ad Amount | Boosters given for a rewarded ad in the booster popup. |
| Undo / Hint / Shuffle Price | Price of a booster pack in coins. |
| Free Coins Amount | Coins for watching a rewarded ad in the shop. |
Star Chest and Lucky Spin
| Field | Meaning |
|---|---|
| Chest Stars, Chest Rewards | Stars needed to open the chest, and what it gives. |
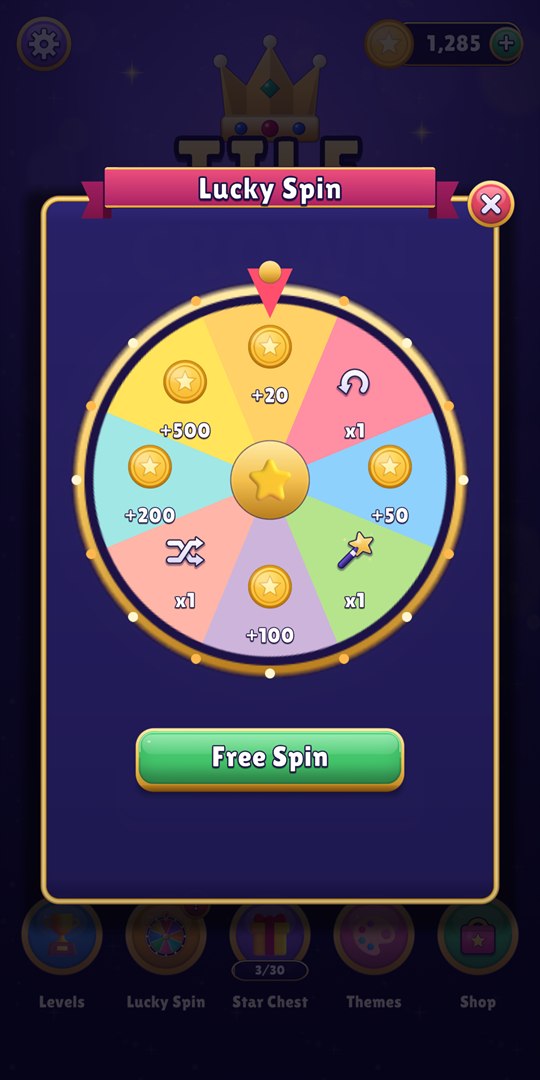
| Spin Slots | The eight wheel slots: reward, weight (higher = more likely) and color. |
| Spin Ads Per Day | Extra spins a player can unlock with rewarded ads each day, after the free one. |
Ads, purchases, links, themes
Ads and purchases are explained in Ads and In-app purchases, themes in Themes. The Links group holds your privacy policy, your store pages (for the Rate button) and your support e-mail, used by the Settings popup.
Levels & Level Editor
Levels are JSON files in TileMatch/Resources/Levels, named level_0001.json, level_0002.json and so on. If the player goes past the last file, the game generates the next level on the fly with the same difficulty curve, so it never runs out.
The curve introduces the game gently, grows the boards over the first 90 levels, then keeps a steady difficulty: in every group of ten levels the last two are harder. When levels are batch generated, each one is checked by the difficulty bot, and a layout the bot almost never wins is replaced by another one.
Opening the editor
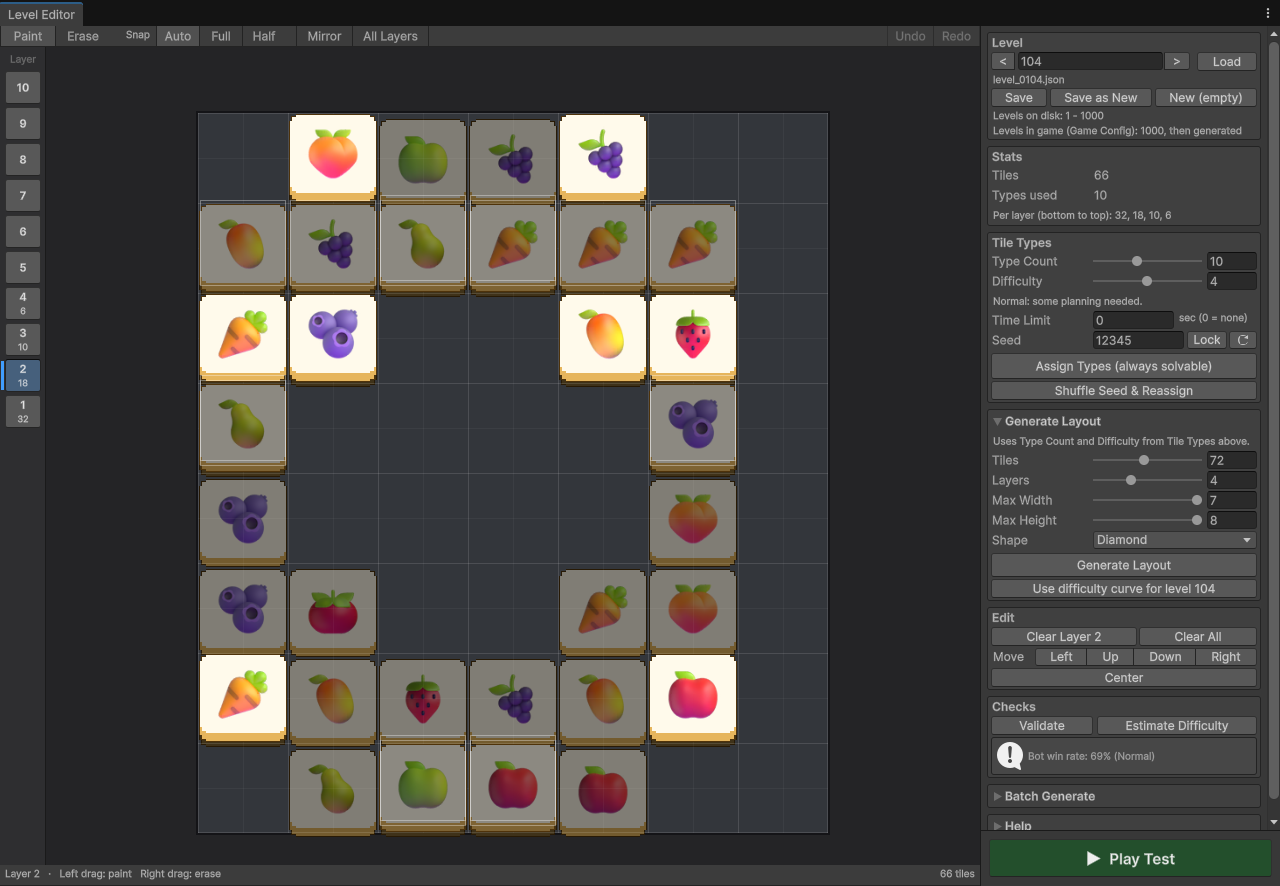
Choose . Type a level number and press Load, or use the arrows. Save writes the level number shown in the field (type another number to save a copy there), Save as New uses the first free number and New (empty) starts from scratch.
Making a level
- Pick a layer with the buttons on the left (they show how many tiles each layer has) and paint with the left mouse button. Right drag or Shift + drag erases.
- Or open Generate Layout, choose the number of tiles, layers, the size and a shape, and press Generate Layout. You get a new layout each time; tick Lock next to the seed to get the same one again. Use difficulty curve for level N fills these fields with the settings of the built-in curve.
- In Tile Types, set how many different pictures the level uses and the difficulty (how far apart matching tiles are), then press Assign Types (always solvable). Types are placed along a valid removal order, so the level can always be finished.
- Validate checks the tile count and overlaps. Estimate Difficulty lets a bot play the level 300 times like a casual player and shows how often it wins: Easy from 75%, Normal from 45%, Hard from 20%, Very Hard below.
- Play Test runs the level in the Main scene without saving it. Save when you are happy.
Tools and shortcuts
- Paint / Erase (E) and Mirror (M), which paints the mirrored tile too.
- Snap: Auto uses whole tiles on layer 1 and half steps above it, Full and Half force one or the other.
- All Layers shows every layer at once. Darkened tiles are covered: the player can't tap them at the start.
- 1–9 and 0 pick a layer. Ctrl+Z / Ctrl+Y undo and redo (Cmd on Mac).
- Undo, Redo, Erase and Mirror can be rebound in .
- Edit clears a layer or everything, moves the whole layout, or centers it.
When a level file changes on disk, for example after you replace it, the window loads the new version, unless you have unsaved changes.
Generating many levels
The Batch Generate section creates any range of level files from the difficulty curve. Leave Overwrite off to only fill missing numbers.
File format
{
    "version": 1,
    "typeCount": 4,
    "timeLimit": 0,
    "tiles": [
        { "x": 4, "y": 2, "z": 0, "t": 3 },
        { "x": 6, "y": 2, "z": 0, "t": 2 }
    ]
}
typeCount is the number of different pictures the level uses and timeLimit is in seconds (0 = no timer). In tiles, x and y are in half tiles, so a tile on an upper layer can sit between two tiles below it. z is the layer (0 = bottom) and t the tile type. Each type must appear a multiple of three times.
Themes
Tile themes
A tile theme (TileMatch/Config/Tiles_*.asset) sets the pictures shown on the tiles:
| Field | Meaning |
|---|---|
| Name Key | Localization key of the theme name. |
| Price | Coins to unlock it (0 = free). |
| Preview | Picture shown in the Themes popup. |
| Tile Sprite, Tile Color | The tile face and its tint. |
| Icons | The pictures, 24 in each included theme. A theme needs at least as many icons as the highest typeCount of your levels: the included levels use up to 11, the Level Editor allows up to 24. |
To add a theme, duplicate an existing asset, drop in your pictures, and add it to Tile Themes in the Game Config.
Backgrounds
Background themes (Background_*.asset) have a name key, a price, the background sprite, the color of the sparkle pattern and the tray tint. Add them to Backgrounds in the Game Config.
Reskinning
- Pictures: replace any PNG in
TileMatch/Artwith your own file of the same name. Buttons, panels and frames are 9-sliced, keep the borders when you draw your own. reapplies the import settings if you change them by mistake. - Screens and popups: open the prefabs in
TileMatch/Prefabs/UI. Everything is plain uGUI and TextMesh Pro. - Logo: edit
Prefabs/UI/Logo.prefab, used by the loading screen and the home screen.Art/UI/logo.pngis a picture of the same logo for the Unity splash screen, which is off by default; replace it too if you turn the splash on. - Fonts: assign another TextMesh Pro font asset to the texts, or replace the TTF files in
TileMatch/Fonts. - Sounds: replace the WAV files in
TileMatch/Audio, keeping the names, or assign new clips on the Audio object of the Main scene. - App icon and name: . The icon files are
app_icon*.pnginArt/UI: the full icon, the round one for older Android versions, and the background and foreground layers of the Android adaptive icon.
Localization
All texts are in TileMatch/Resources/Localization/strings.csv: one row per text, the key first, then one column per language. Lines starting with # are section titles and are ignored.
key,en,fr
# General
language_name,English,Français
level_n,Level {0},Niveau {0}- Edit the file in any spreadsheet program and save it as CSV (UTF-8).
- To add a language, add a column with its code (for example
es) and fill inlanguage_namefor it. Then add the matching case inFromSystemLanguageinLoc.csso the game picks it from the phone's language. The language button in Settings cycles through every column. - In the scene, texts use the Localized Text component with a key. In code, use
Loc.Get("key")orLoc.Format("key", value). Numbers go throughLoc.Number, which formats them the way each language expects (1,250 in English, 1 250 in French).
Ads (AdMob)
The Google Mobile Ads plugin is included and enabled ( is ticked). Out of the box every ad uses Google's official test ids, so you can safely try all formats.
Using your own AdMob account
- Create your app in AdMob and one ad unit per format: banner, interstitial, rewarded and app open.
- Put your App IDs in .
- Paste the ad unit ids into Admob Android and Admob Ios in the Game Config.
- Untick Test Ads in the Game Config before publishing. While it is ticked, Google's test units are used whatever ids you entered, so a test build can never show live ads.
Consent (GDPR)
The game uses Google's User Messaging Platform. Create a consent message in AdMob under Privacy & messaging and the form shows automatically to users in regions that need it. Ads are only requested once consent allows it, and a Privacy button appears in Settings when the user must be able to change their choice. If the consent request fails (no internet), it is tried again when the app comes back to the foreground.
When ads show
| Format | Behavior (Game Config) |
|---|---|
| Banner | At the bottom of every screen when Use Banner is on. The layout moves up to make room. |
| Interstitial | After a level, from level Interstitial From Level, every Interstitial Every levels, and never within Interstitial Cooldown seconds of another full screen ad. |
| Rewarded | Continue after losing, free coins in the shop, boosters in the booster popup, double win reward, extra Lucky Spins. These buttons only become available once an ad has loaded. |
| App open | When the player comes back after at least App Open After Seconds away, if Use App Open is on. Skipped right after another full screen ad and while a purchase is in progress. |
The No Ads purchase removes banners, interstitials and app open ads. Rewarded ads stay available because the player chooses to watch them. To turn ads off completely, untick Enable Ads in the Game Config.
Building without the plugin
Untick . The game then compiles without any Google code and runs without ads. To remove the plugin files as well, delete the GoogleMobileAds and ExternalDependencyManager folders, the Google Mobile Ads files in Plugins/Android and Plugins/iOS, and the lines between Android Resolver Dependencies Start and End in Plugins/Android/mainTemplate.gradle.
In-app purchases
The shop sells the Products listed in the Game Config through Unity IAP:
| Field | Meaning |
|---|---|
| Product Id | Must match the id you create in Google Play Console and App Store Connect. |
| Kind | Coins (consumable), NoAds (non-consumable) or Bundle (coins + boosters; non-consumable when it removes ads). |
| Coins, Boosters, Removes Ads | What the purchase gives. |
| Title Key, Icon, Best Value | How it looks in the shop. |
| Fallback Price | Shown until the store returns the real, localized price. |
- Change the ids from
com.yourcompany.tilecrown.*to your own. - Create the same products in Google Play Console (Monetize → Products → In-app products) and App Store Connect. Google only returns products once a build is uploaded to a testing track.
- Add your Google account as a license tester to buy without being charged.
One-time products (No Ads, the starter bundle) are delivered once and disappear from the shop after purchase. Payments the store confirms later, such as cash payments on Google Play, show a "Purchase pending" message and are delivered when they go through. On iOS, Settings and the shop have a Restore button (it also shows in the editor so you can test it).
Building
Android
- In set your company name, product name, Package Name and version.
- Create a keystore under Publishing Settings.
- If Gradle complains about missing dependencies, run .
- Tick Build App Bundle (Google Play) in the build profile and build.
The project targets Android 7.0 (API 24) and newer, ARM64 and ARMv7 with IL2CPP, and uses ASTC texture compression.
iOS
- Set the Bundle Identifier and signing team in the Player settings. The minimum iOS version is 13.
- Build, then open the generated
.xcworkspace(not the .xcodeproj). CocoaPods installs the Google Mobile Ads SDK during the build. - The App Tracking Transparency text is set in .
Publishing checklist
- Your own package name / bundle identifier, product name, icon and version.
- Your AdMob App IDs and ad unit ids, and Test Ads unticked.
- A consent message published in AdMob (Privacy & messaging).
- Your product ids in the Game Config and the same products created in the stores.
- Your privacy policy, store links and support e-mail in the Game Config.
- A release keystore (Android) and signing team (iOS).
- Tested a release build on a real phone.
Code overview
The code lives in the TileMatch namespace. The main pieces:
| Class | Role |
|---|---|
| GameController | Entry point on the Game object: starts services, loads levels, switches themes. |
| UIManager | Shows screens (loading, home, levels, game) and keeps track of open popups and the back button. |
| UIScreen, UIPopup | Base classes of every screen and popup, with their show and hide animations. |
| BoardController | Builds the board from a LevelData, handles taps, boosters, win and lose. |
| TrayController | The tray slots: inserting tiles next to their twins and clearing matches of three. |
| LevelRepository, LevelGenerator | Load level files; generate solvable levels when a file is missing. |
| SaveManager, PlayerData, Wallet | Progress saved as JSON in PlayerPrefs; coins, boosters and pending rewards with change events. |
| AdsManager, IAPManager | One simple API for ads and purchases, whatever the provider. |
| AudioManager, Haptics, Loc | Sounds and music, vibration, texts. |
| Tween | A small tweening helper used by every animation, no extra package needed. |
How rewards are handed out
Winning a level, opening the Star Chest or landing on a Lucky Spin prize saves the reward as pending right away, together with the progress. The popup then shows it and Wallet.ClaimPending() adds it to the wallet when the player collects it. If the app is closed in between, the reward popup comes back on the next launch.
Adding a popup
- Create a class that inherits from
UIPopupand overrideOnOpen. - Duplicate a popup prefab from
Prefabs/UI, swap the component, place it under Canvas/Popups in the Main scene. - Add it to the Popups list of the UIManager on the Canvas, then open it from code with
UIManager.Instance.Get<MyPopup>().Open().
Troubleshooting
No ads show on my phone
Check that the phone has internet, that Enable Ads is on and that you haven't bought No Ads in that install. Live ad units can take hours to start serving after you create them; keep Test Ads on until then. In the EU the consent form must be answered first.
"Store not available right now"
The store doesn't sell your products yet: they aren't created, not active, or the build isn't uploaded to a testing track. Use a development build with Test Purchases on to test the flow meanwhile.
Pink or missing images in a build
must list UI/Default in Always Included Shaders. It is set in this project; keep it if you change graphics settings.
Gradle or dependency errors on Android
Run , and make sure the Gradle templates in Plugins/Android are enabled in the Player settings (Publishing Settings).
My saved progress in the editor gets in the way
Use .
A level file won't load
If a file can't be read, the game logs an error and plays a generated level with that number instead, so players are never stuck. Open the level in the Level Editor to see what is wrong: it marks unreadable files and Validate lists the problems.
Credits & licenses
The game, its code, the user interface art, the logo, the sounds and the levels are original work made for this project. The following assets are included; their licenses are in TileMatch/ThirdPartyLicenses (or next to the asset) and allow commercial use:
| Asset | License |
|---|---|
| Microsoft Fluent Emoji (tile pictures and some icons) | MIT |
| Fredoka font | SIL Open Font License 1.1 |
| Lilita One font | SIL Open Font License 1.1 |
| Google Mobile Ads Unity plugin | Apache 2.0 |
| External Dependency Manager for Unity | Apache 2.0 |
| TextMesh Pro essential resources, including the Liberation Sans font | Unity Companion License; Liberation Sans: SIL Open Font License 1.1 (in TextMesh Pro/Fonts) |
| Unity IAP | Unity's package terms (installed from the Package Manager) |
Changelog & support
1.0.0
- First release.
Questions or problems? Contact us through the comments on the item page or the support form on our profile. Please include your Unity version and the platform you build for.